


Photo by Marius Niveri on Unsplash
Write your first smart contract on Dotsama (Polkadot / Kusama), Deploy it in smart contract local node and execute with the help of Polkadot-js apps


1. Setting up the environment:
Rust and Cargo Setup : We need to set up our machine to compile and execute a Rust program, Follow the Link, and make sure the following commands on your terminal prints the latest rustc and cargo versions. Rustc is the compiler and cargo is the package manager.
rustup --version
cargo --version
Usually, it prints something like this.
rustup 1.24.3 (ce5817a94 2021-05-31)
info: This is the version for the rustup toolchain manager, not the rustc compiler.
info: The currently active `rustc` version is `rustc 1.57.0 (f1edd0429 2021-11-29)`

cargo 1.57.0 (b2e52d7ca 2021-10-21)
Cargo-Contract Setup: Cargo contract is a CLI tool that helps set up and manage WebAssembly smart contracts written with ink!. so, what is a web assembly smart contract? and what is this ink with an exclamation (or bang) mark?
Ink! is a domain-specific language to write smart contracts in Rust. The smart contracts written in Ink! will be compiled into web assembly and executed in substrate-based blockchains.
cargo install cargo-contract --force
cargo contract --version
Also, verify the latest cargo contract as below,
cargo-contract 0.17.0-unknown-aarch64-macos
Rust Nightly Build Setup: Also, to compile and execute Ink! smart-contracts, we need nightly build of rust. you can get it done by executing the following commands (here, its mac apple silicon specific): you can also refer to this link.
rustup component add rust-src --toolchain nightly-aarch64-apple-darwin
Binaryen setup : Binaryen is a compiler and toolchain infrastructure library for WebAssembly, written in C++. It aims to make compiling to WebAssembly easy, fast, and effective. Here I am installing with brew with the following command, you can also try from this Link
brew install binaryen
substrate-contracts-node : Clone this repo and install all the required dependencies by executing following commands.
cargo install contracts-node --git https://github.com/paritytech/substrate-contracts-node.git --force --locked
Probably, it will take few minutes to install all the dependencies. Post-installation, Run your local node by executing
substrate-contracts-node --dev --tmp
Open polkadot_js apps and verify whether the local node is selected.
2. Writing SmartContract :
Creating a new Ink! Project: Let's create a new Ink! Project with the name Flipper with the following command.
cargo contract new Flipper
You would probably have a folder structure like this
...Flipper
   ...cargo.lock
   ...cargo.toml
   ...lib.rs
Here, In lib.rs where you will write our smart contract, Before we write our own contract, let's understand a few macros and their purposes.
use ink_lang as ink;

#[ink::contract]
#[ink(storage)]
#[ink(constructor)]
#[ink(message)]
#[cfg(test)]
#[ink::test]
#[ink::contract] - This macro is the entry point for writing ink! smart contracts. Usually, we annotate this macro over a module. Also, this macro fully analyses its input smart contract against invalid arguments and structure.
#[ink(storage)] - This macro defines the layout of the storage that the ink! smart-contract operates on. Applied on struct types in order to flag them for being the contract's storage definition. There can only be one ink! storage definition per contract.
#[ink(constructor)] - This macro can be applied over a method.Flags a method (or multiple methods) for the ink! storage struct as constructor making it available to the API for instantiating the contract. A contract may define multiple such constructors which allow users of the contract to instantiate a contract in multiple different ways.
#[ink(message)] - This macro can be applied over a method. Flags a method for the ink! storage struct as message making it available to the API for calling the contract. Note that all public functions must use the #[ink(message)] attribute. There must be at least one #[ink(message)] defined method. An ink! smart-contract can have multiple such ink! messages defined. An ink! message with a &self receiver may only read state whereas an ink! message with a &mut self receiver may mutate the contract's storage.
#[cfg(test)] - This macro is applied over a testing module and tells the Rust compiler that the following code should only be compiled when the test configuration is active.
#[ink::test] - This macro is applied over the ink test methods.
Refer to the above macros and go through the Flipper code :
#![cfg_attr(not(feature = "std"), no_std)]

use ink_lang as ink;

#[ink::contract]
mod Flipper {
    #[ink(storage)]
    pub struct Flipper {
        value: bool,
    }

    impl Flipper {

        #[ink(constructor)]
        pub fn new(init_value: bool) -> Self {
            Self { value: init_value }
        }

        #[ink(constructor)]
        pub fn default() -> Self {
            Self::new(Default::default())
        }

        #[ink(message)]
        pub fn flip(&mut self) {
            self.value = !self.value;
        }

        #[ink(message)]
        pub fn get(&self) -> bool {
            self.value
        }
    }

    #[cfg(test)]
    mod tests {
        use super::*;
        use ink_lang as ink;
        #[ink::test]
        fn default_works() {
            let Flipper = Flipper::default();
            assert_eq!(Flipper.get(), false);
        }
        #[ink::test]
        fn it_works() {
            let mut Flipper = Flipper::new(false);
            assert_eq!(Flipper.get(), false);
            Flipper.flip();
            assert_eq!(Flipper.get(), true);
        }
    }
}
To run tests
cargo test
Now it's time to compile the code and try to deploy it in our local node. Ink! smart contracts still depend on some of the unstable and newly created rust libraries to compile, so we will build our contract with a nightly version of rust.
cargo +nightly contract build
This will take a few seconds, upon completion, you will find Flipper.Contract , Flipper.wasm and metadata.json under ./target/ink/ folder path.
3. Deploying SmartContract:
Running a local Node: Go to the directory where substrate-contracts-node is cloned and all the dependencies are installed. Execute the following command on the root folder,
substrate-contracts-node --dev --tmp
You will see the new block production and finalization every six seconds.
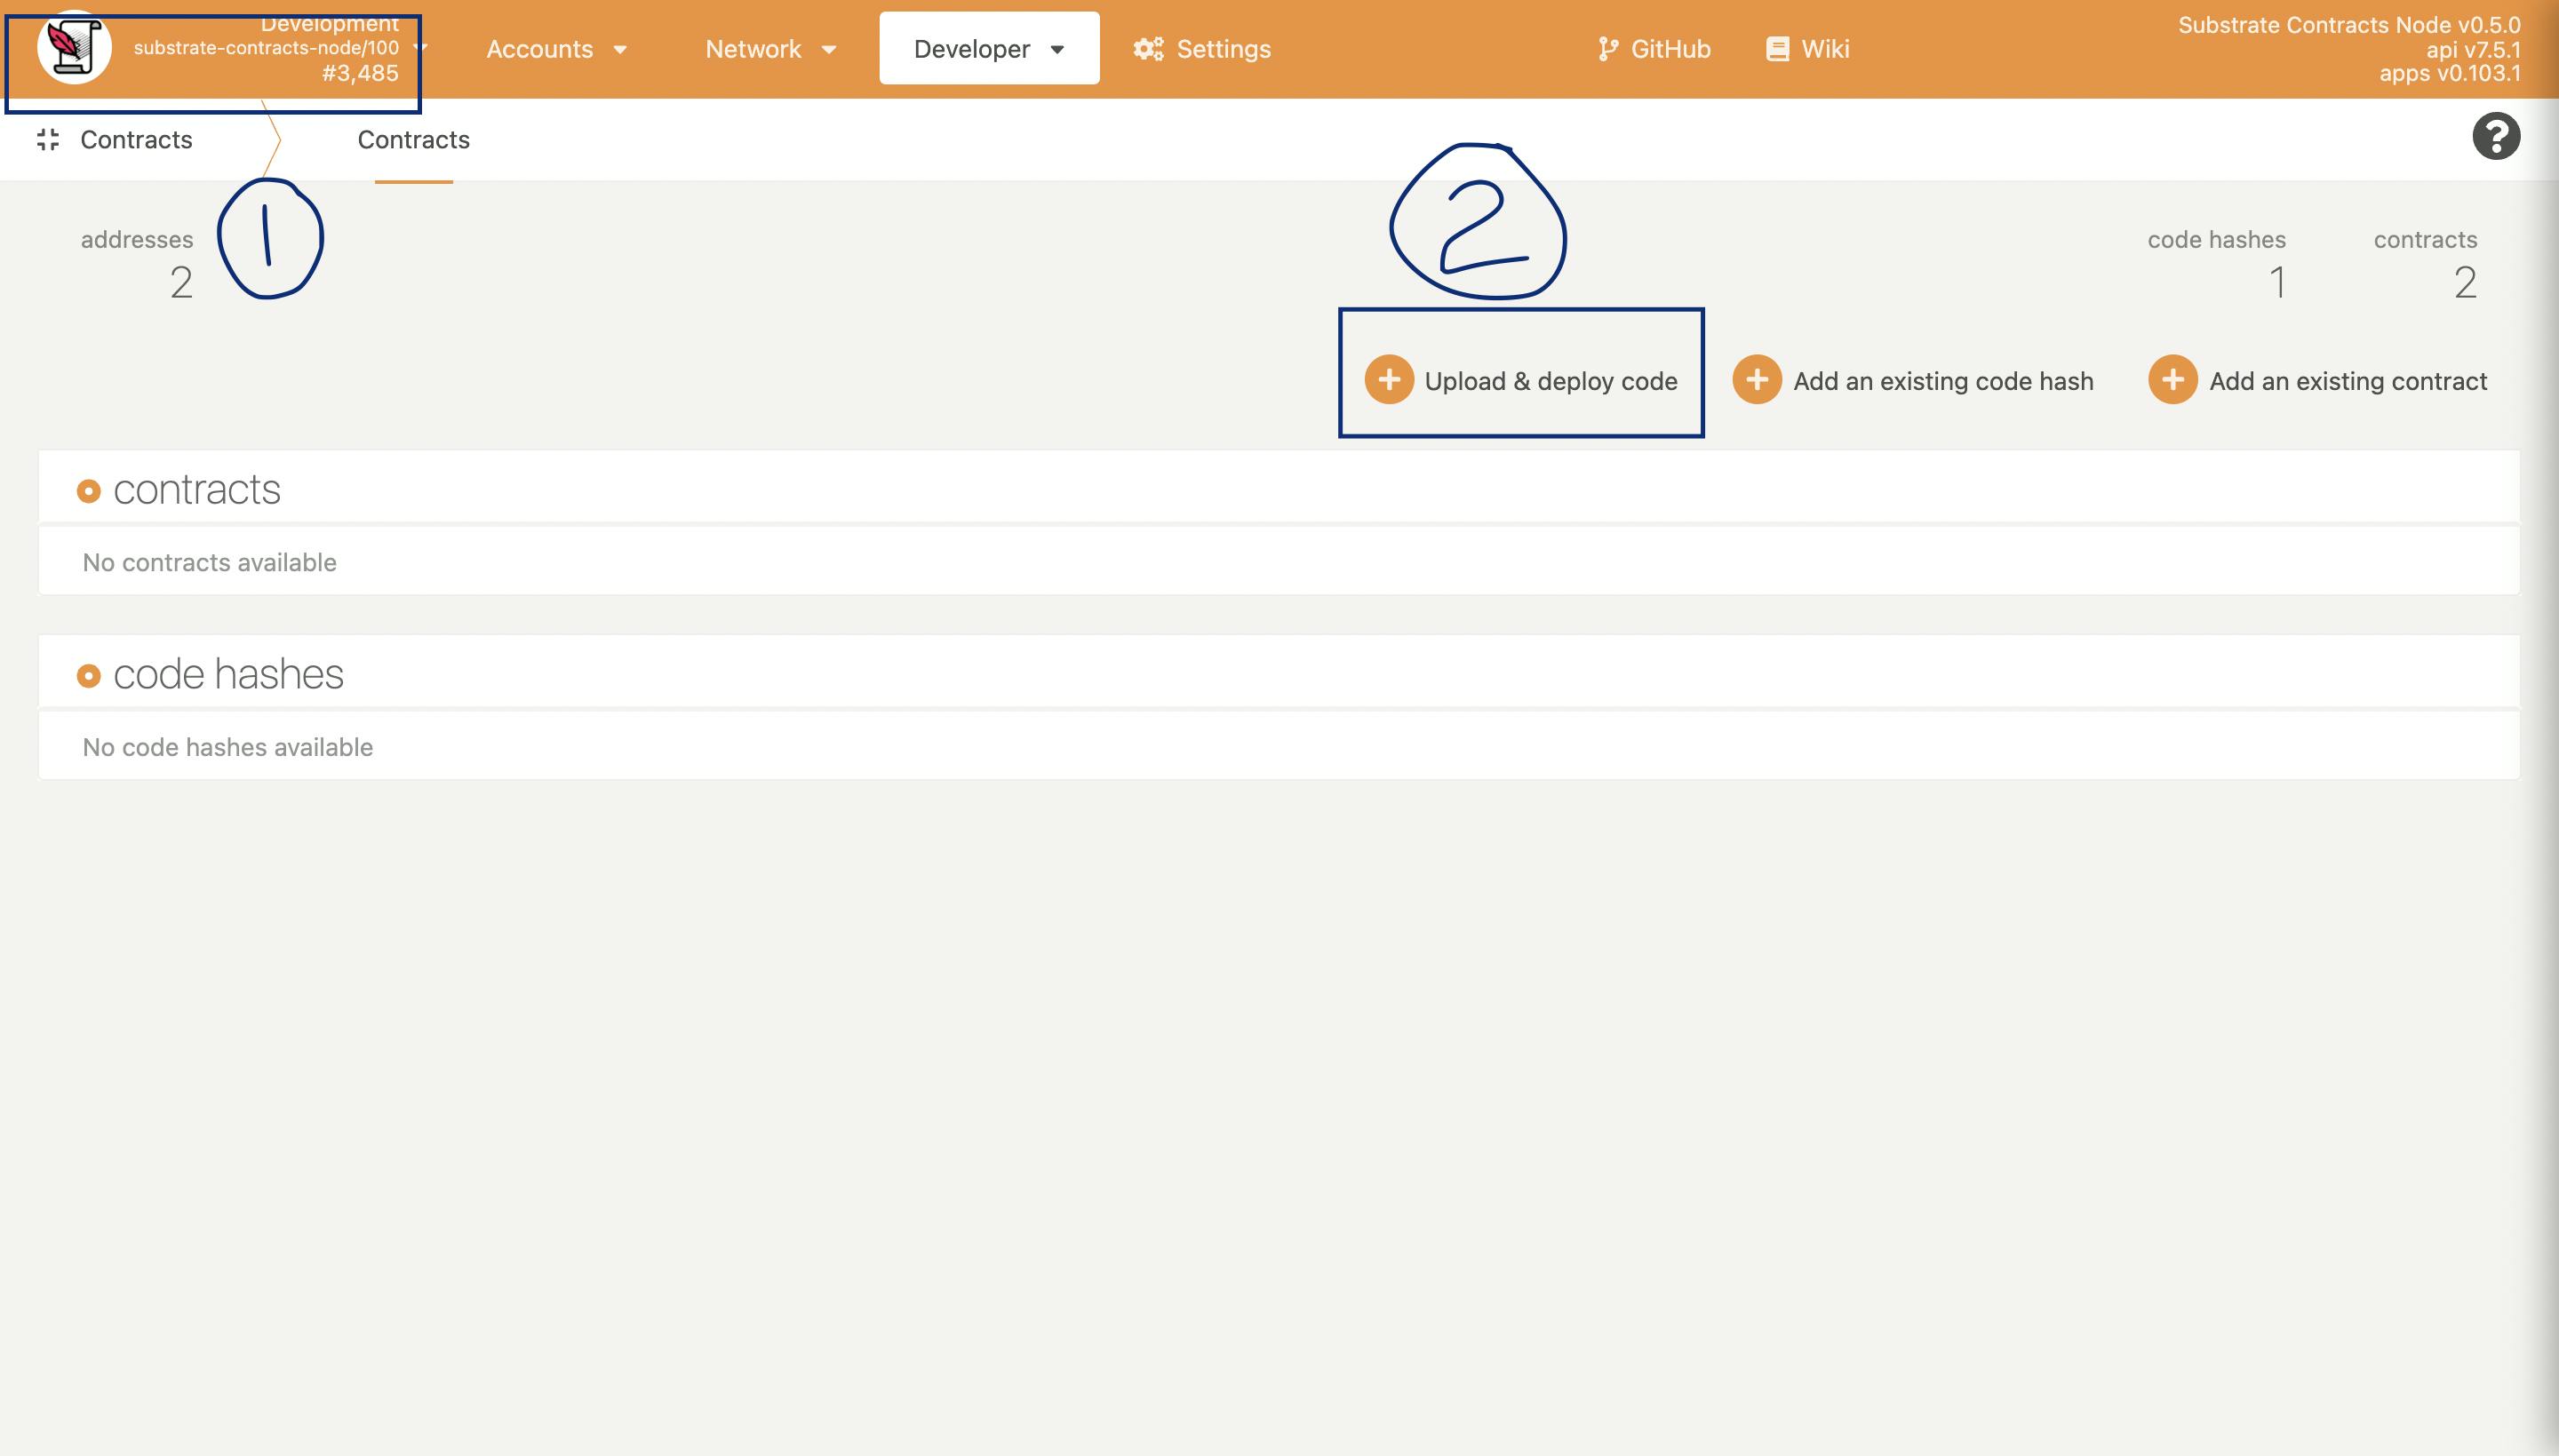
Polkadot-js Apps: visit this page, On the top left, you can verify that your local node running is selected(Numbered 1 in image). Also, you can also see the upload and deploy code action (Numbered 2 in image)
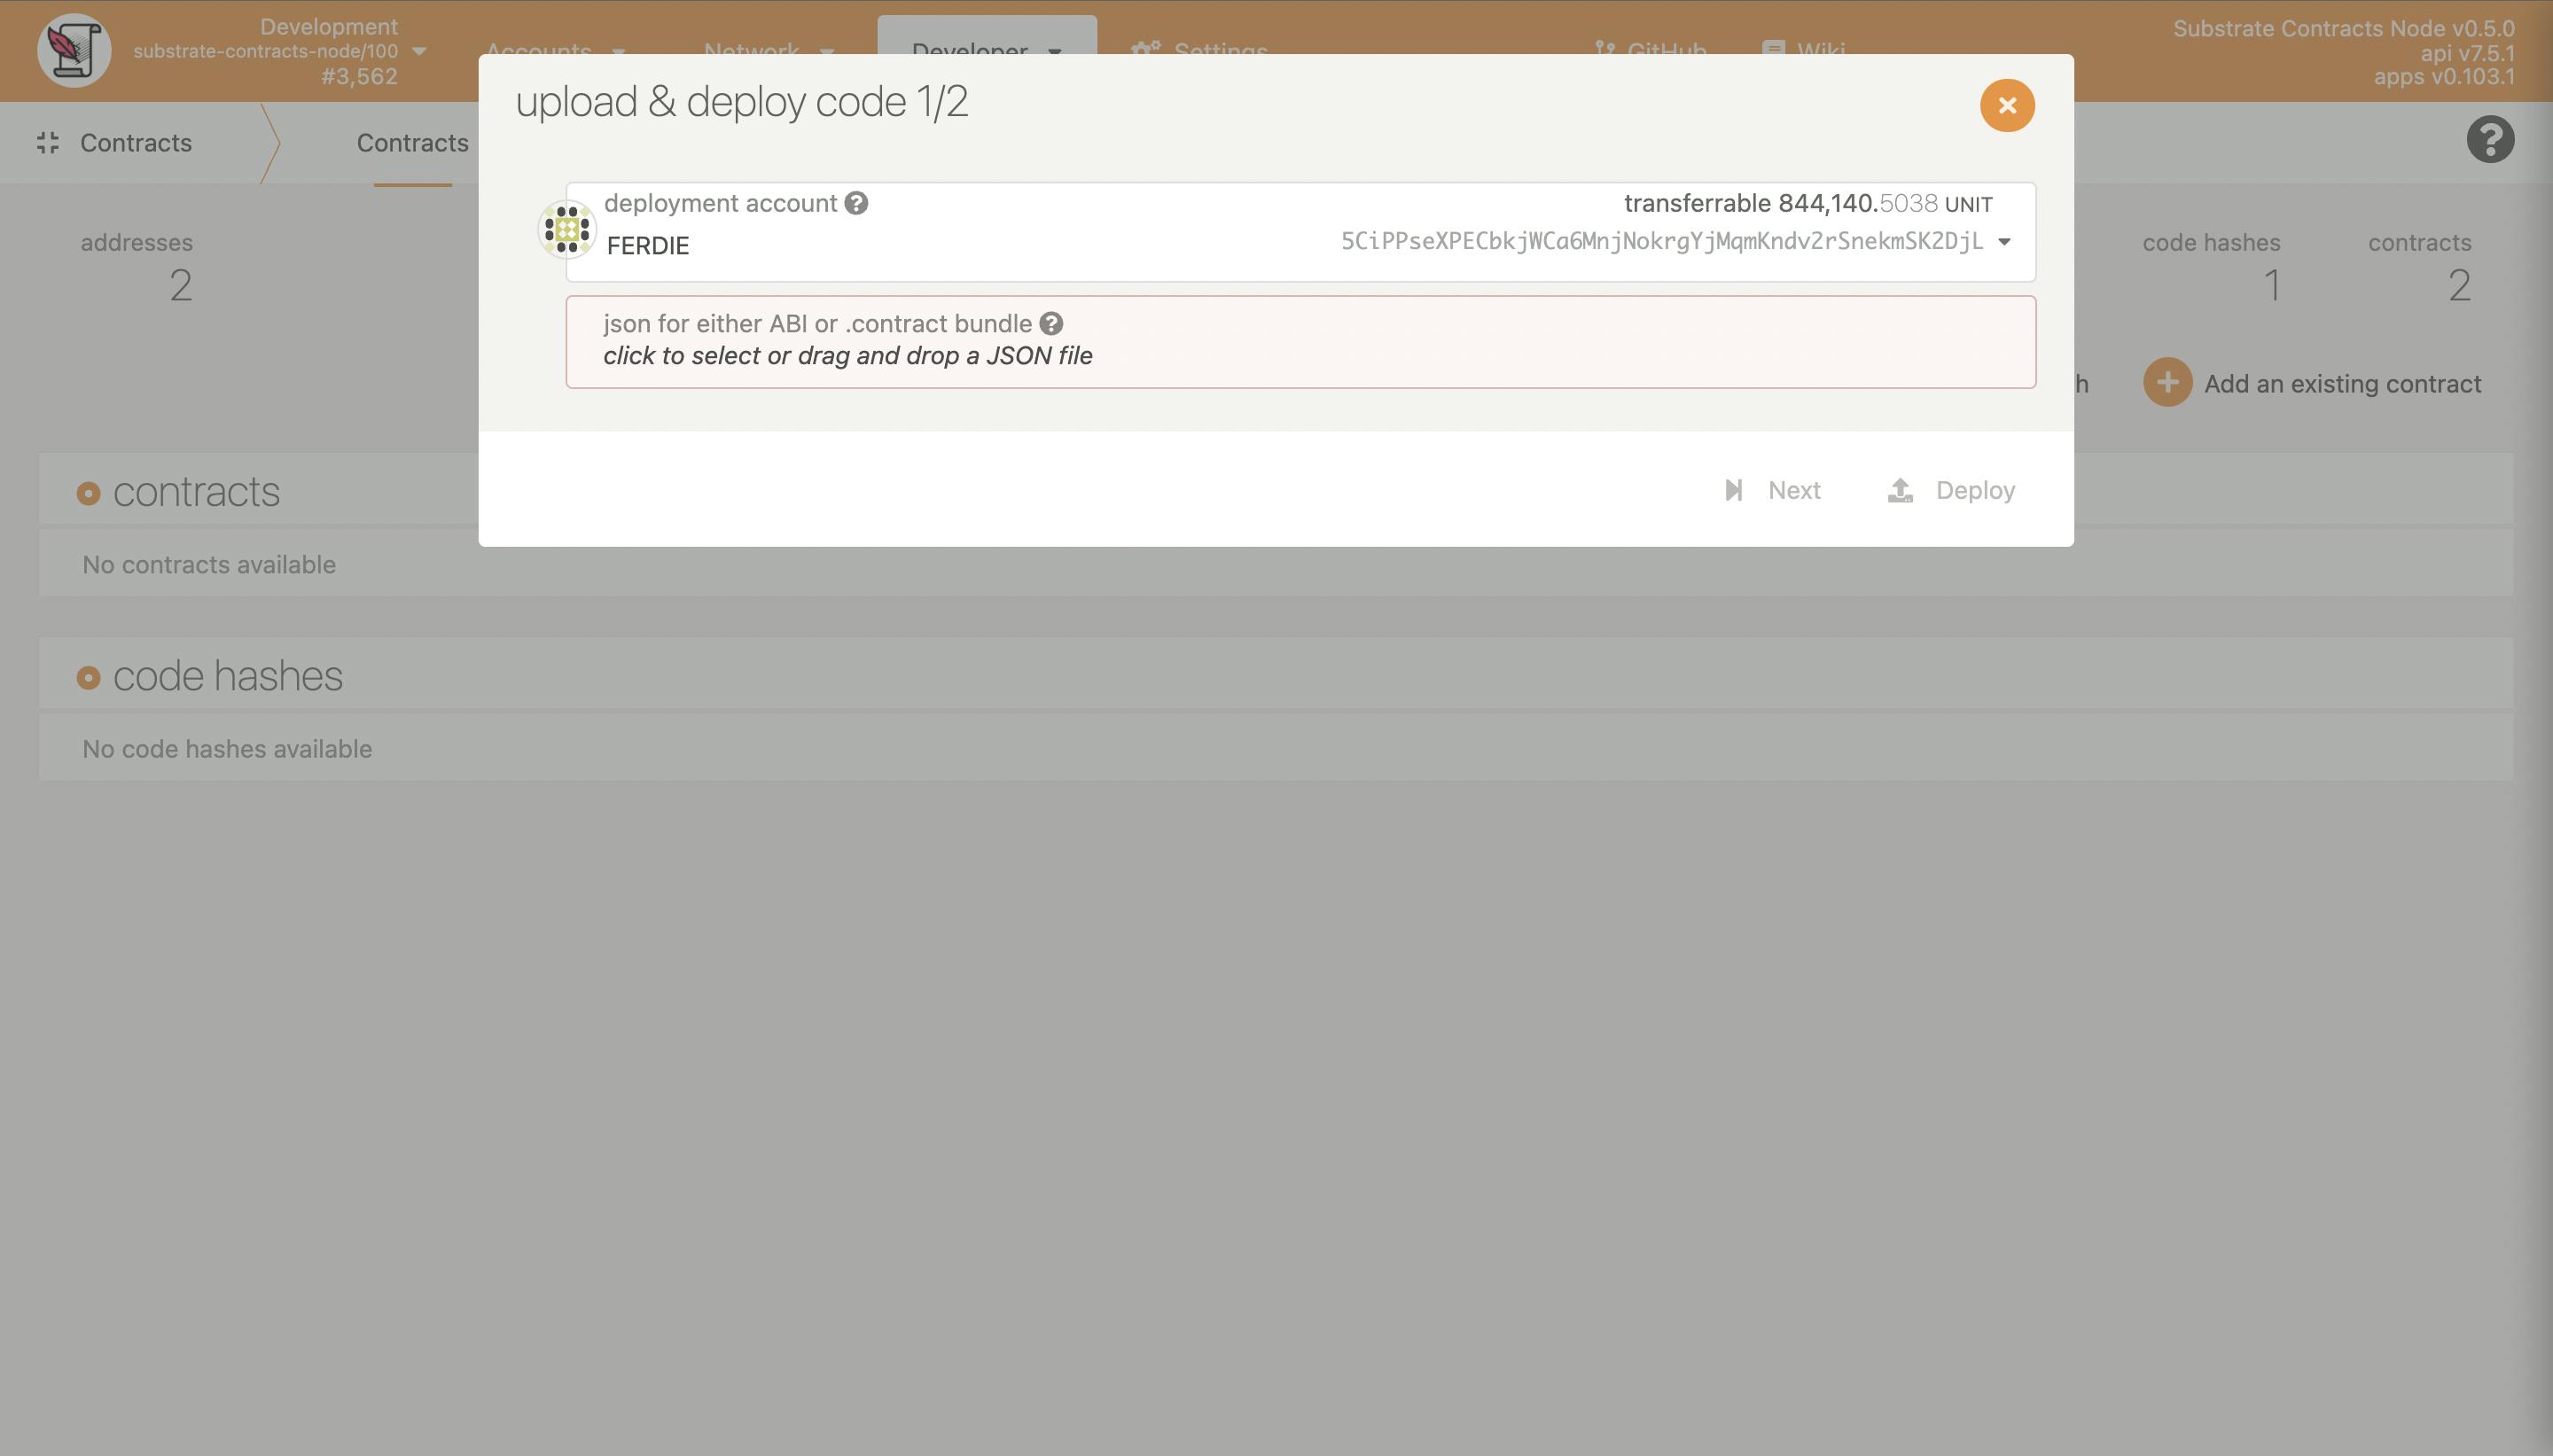
Now click on the upload and deploy action, you will see the FERDIE Account is selected and place to upload your contract, select the Flipper.contract file from your code directory (./target/ink) and deploy.
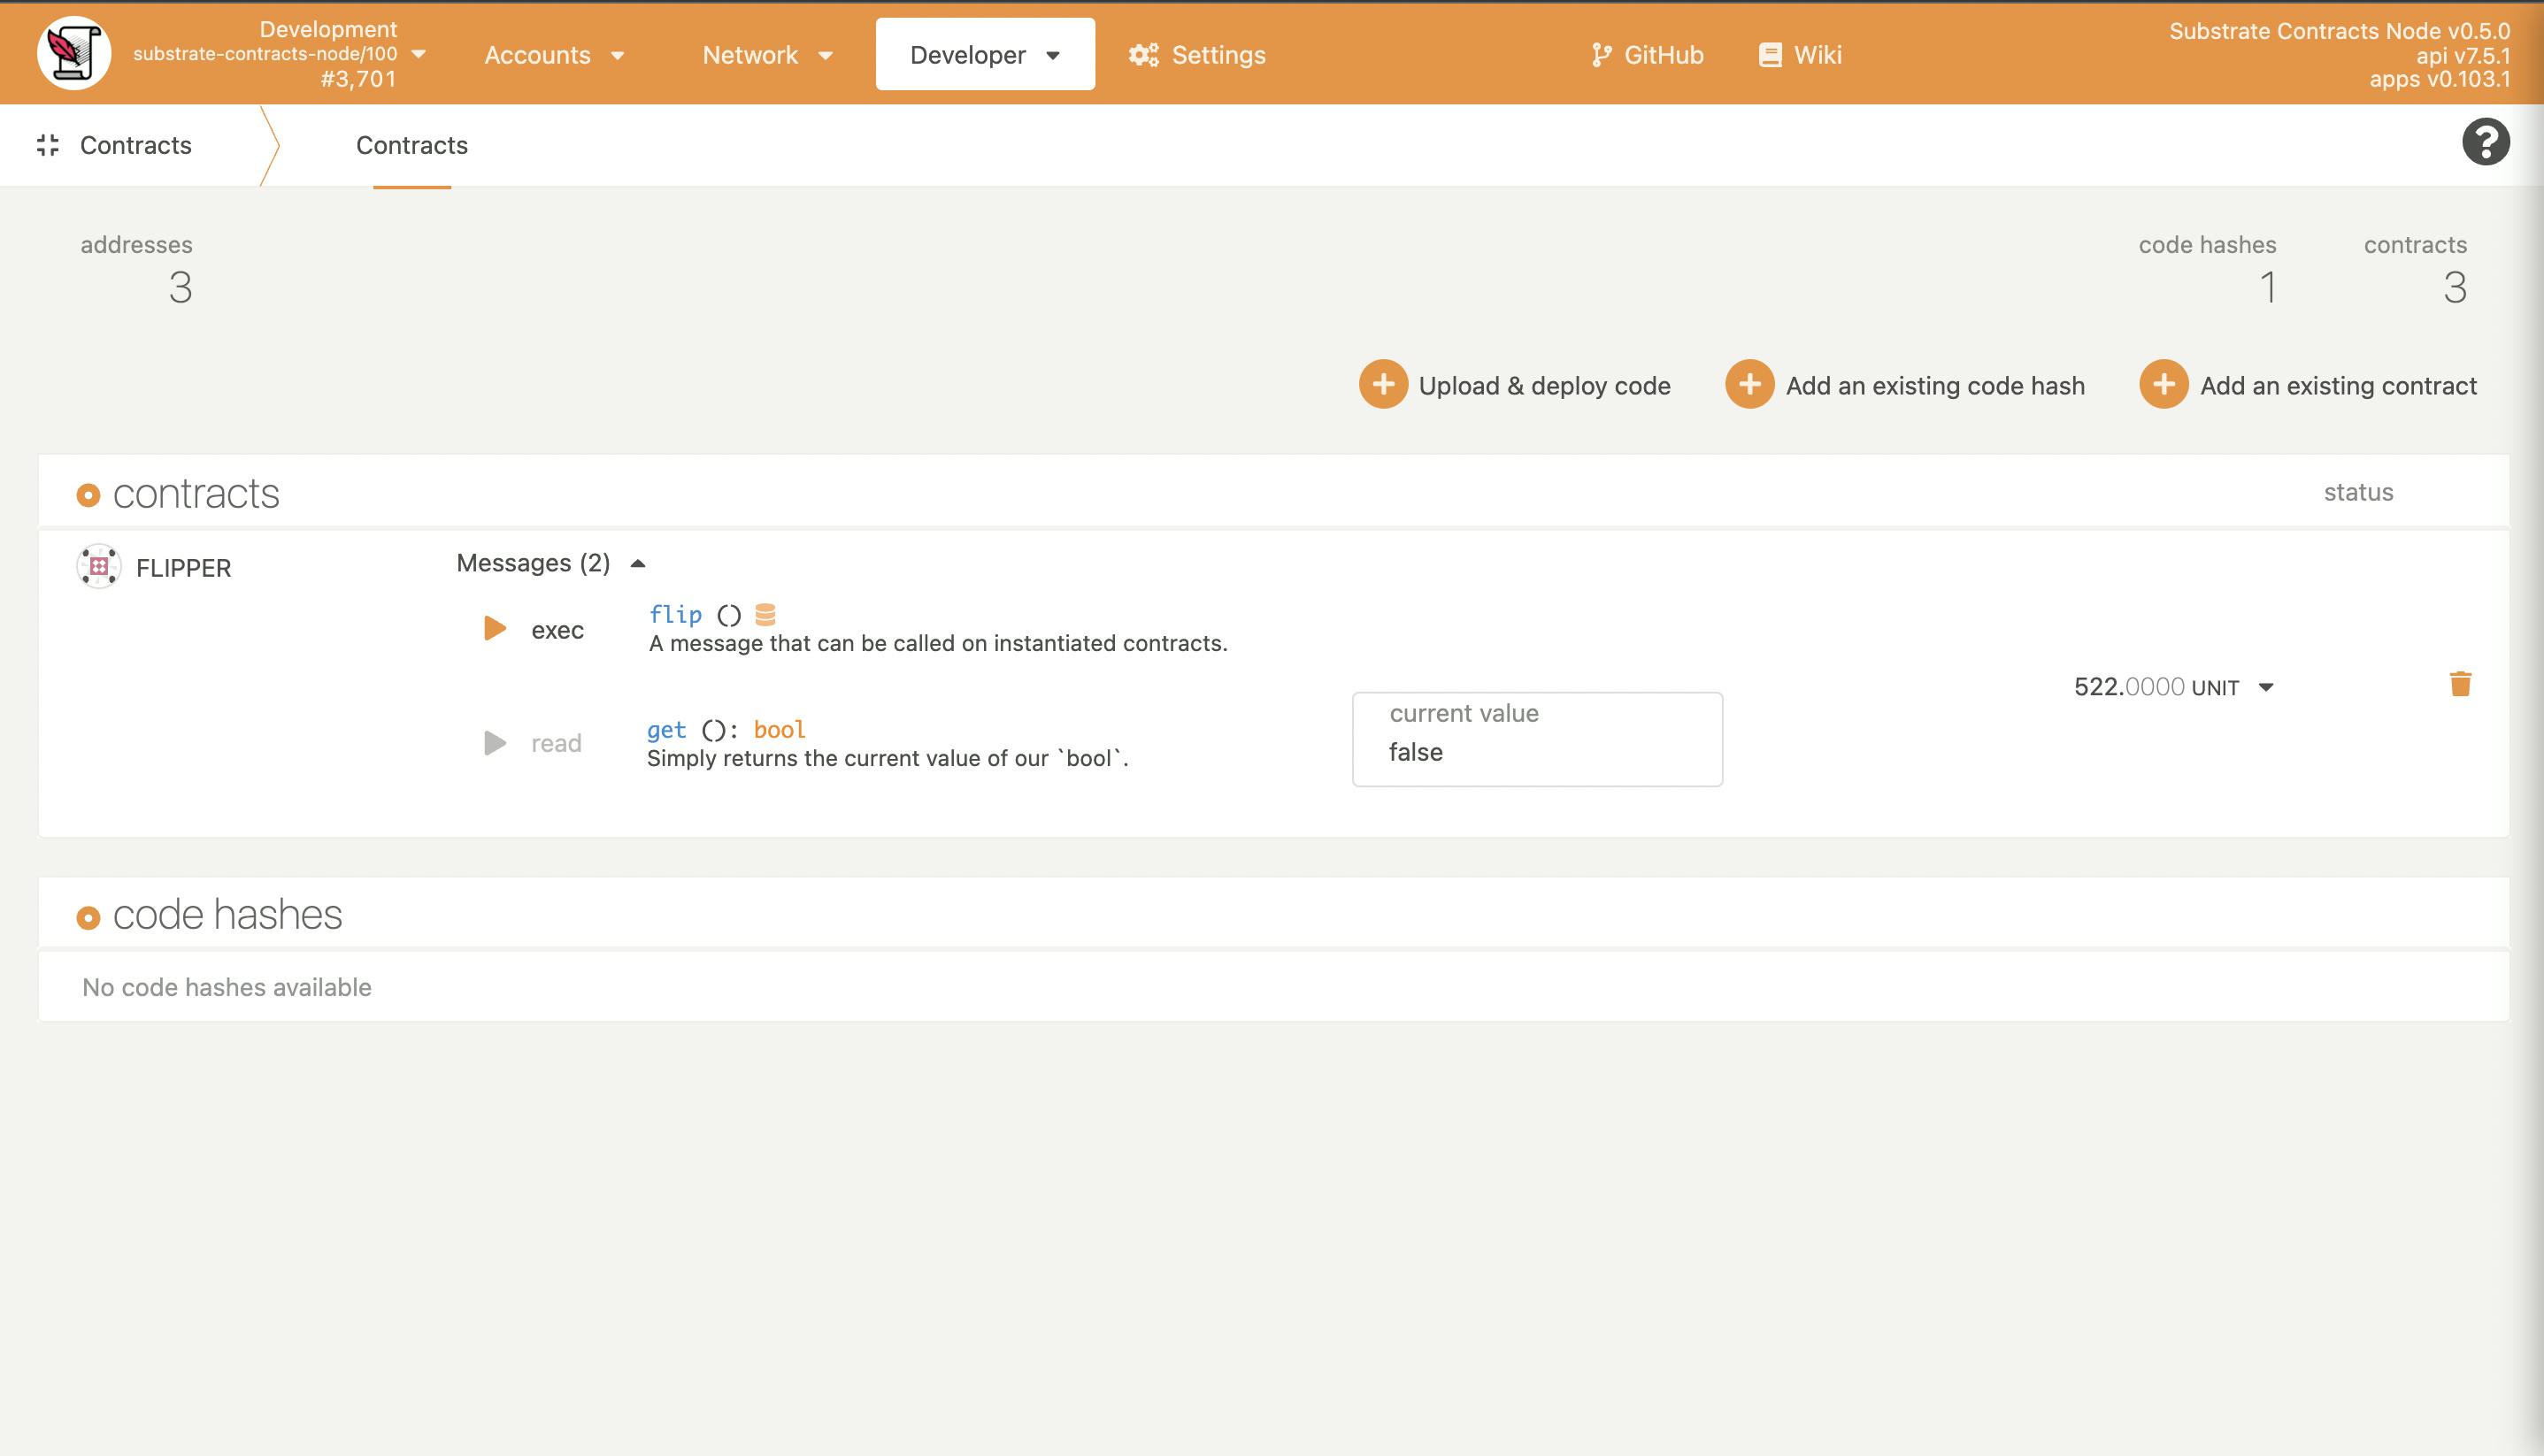
Post-deployment, you can see the Flipper contract under the contracts sub-menu and with on click of messages(2), you can see the available public methods and also on click of "Exec" , you can interact with the public methods.
That's all there for you to do, now you know, one of the many ways of developing smart contracts on Dotsama ecosystem, why don't you try some contracts like ERC20, ERC721/1155 or even EIP 3664? Few examples are mentioned here.
Happy Coding !!!
Sivaganeshan B
polka address : 15tKrF42wKNLswVNT4pkoGhVSHhJBPZpoR6uDMLmjgh4tEuA